Title.
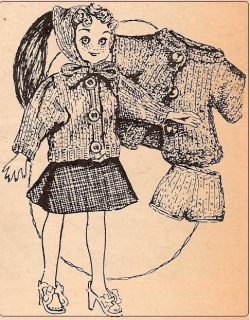
MAKE THESE knot fashions for an 8-inch doll and give it to one of your favourite young misses for a birthday or Christmas gift. Use fingering, sock or baby yarn for the panties, sweater and hat, then change to knitting worsted for the coat. You will need sizes 2 and 4 standard knitting needles, size 2 double pointed knitting needles, sizes 1 and steel crochet hooks, a tapestry needle, seven ¼ – inch size buttons and a small amount of felt for skirt. Abbreviations:
Doll hat: With sock or fingering yarn and number 2 knitting needles, cast on 5 sts.
Row 1: K each st.
Row 2: P each st
Row 3: K1, ( k 1, p 1 ) in next
St, k 1, ( p1, k1 ) in next st, k 1.
Row 4: P each st
Row 5: K each set.
Row 6: P each st
Row 7: K 2, ( k 1, p 1 ) in next st, k 1, (p 1, k 1) in next st, k 2.
Continue to repeat rows 4 through 7 until there are 5 inc rows. The sts at beginning and end of each row inc 1 st on each inc row. After completing the 5th inc row work 7 rows in stockinette st (k 1 row, p 1 row).
Dec Row: K 5, sl 1, k 1, psso, k 1, k 2 tog, k 5.
Work 3 even stockinette rows. Repeat the dec row 4 times, each time there will be one less k st at the beginning and end of row. End with 2 stockinette rows. Bind off.
Using a number 5 steel crochet hook, join thread at one end of hat, ch 33 for tie, turn, sc in second ch st from hook, sc in each remaining ch st, sc in same end of hat, sc along one side of hat, sc in end of hat, ch 33, turn and complete as for first tie, sc at base of first tie, then fasten off.
Sweater: Using same yarn as for hat, cast on 50 sts. Work in ribbing of k 1, p 1 for 3/8- inch. Keeping 5 sts at beginning and end of row in ribbing, work body in stokinette st for 1 ¼ inches, ending with a p row.
Armholes: Continue working the ribbing at beginning and end of row, k 14, bind off 2 sts, k 18, bind off 2 sts, k 14.
Note: While making the right front be sure to make buttonholes at the following points: ¼ inch, 1 inch and ¾ inch after armhole is completed. Buttonholes are made in the following manner: With right side of work facing, k 1, p 1, O, k 2 tog, work in stockinette st across.
Right Front: Work 1 inch in ribbing and stokinette st on the last 14sts worked, end with a p row. Bind off 5 sts at front neck edge, k across.
Next Row: P 7, p 2 tog.
Next Row: K each st.
Next Row: Bind off 4 sts, p remainder of sts.
Left front: Work in same manner as for right front omitting button-holes and being sure to have the bound off sts at front.
Back: Work the center 18 sts in stockinette st for 1 inch. Bind off 4 sts at beginning of each of the next 2 rows. Bind off 3 sts at beginning if each of next 2 rows. Bind off remainder of sts/
Sleeves: Cast on 14sts. Work in ribbing of k 1, p 1 for ½ inch. Work 2 rows even in stockinette. Inc 1 st at beginning of each row 14 times ( an inc of 28 sts ). Bind off all sts. Sew sleeves in place, sew seams and then sew buttons in place.
Doll Coat: With knitting worsted and size 4 standard knitting needles, cast on 44 sts and work in moss st ( k 1, p 1 across one row, then p 1, k 1 across next row ) for ½ inch. Dec 1 st at beginning and end of next row.
Body of Coat – Row 1: K 9, k 2 tog, k 6, k 2 tog, k 6, sl 1, k 1, psso, k 5, sl 1, k 1, psso, k 8.
Row 2: P each st.
Row 3: K 8, k 2 tog, k 5, k 2 tog, k 5, sl 1, k 1, psso, k 8.
Row 4: P each st.
Row 5: K 7, k 2 tog, k 4, k2 tog, k4, sl 1, k 1, psso. K 3, sl 1. K 1, psso, k 8.
Row 6: P each st.
Row 7: K 6, k 2 tog, k 3, k 2 tog, k 3, sl 1, k 1, psso, k 2, sl 1, k 1, psso, k 8. ( 26sts ).
Work in stockinette st on these sts until piece measures 2 ¼ inches from cast on sts and place these sts on st holder. Cast on 7 sts for sleeve, now k the 7 sts for sleeve, now k the 7 sts, k 12 sts for back, place 7 sts remaining on left needle on st holder, now cast on 7sts for other sleeve. Work across these 26 sts in stockinette st for 7 rows.
Neck: K 8, bind off 8 sts, k 8, place these 16 sts on st holder. Cut yarn.
Right Front: Pick up 7 sts fro right front, cast on 7 sts at armhole edge. Work 7 rows in stockinette st, end at front edge. Bind off 6 sts, k each remaining st across.
Next Row: P 6, p 2 tog.
K next row: Using tapestry needle threaded with about 12-inch length of yarn left after last st, weave these remaining sts with corresponding sts from right back sleeve. Weave in stockinette st as shown in ketch for a smooth joining.
Work left front and sleeve in same manner.
Edge: Beginning at left front edge, use number 1 steel crochet hook, work a row of s up front and around neck and down right front.
Ch 1, turn, sc up right front, be sure to ch 2, sk 2 sc, sc in next sc for a buttonhole at 3 evenly spaced intervals on right front. Work around and down left front with a sc in each sc. Fasten off. Sew buttons in place on left front.
To complete the sleeves, fold back one row of sts on each side underarm edges and sew.
Panties: With fingering or sock yarn and number 2 double pointed knitting needles, cast on loosely 32 sts. Divide sts on three needles: 12, 10, 10. K one row. Work in ribbing of k 1, p 1 for 1 ¼ inches. Now k 16 sts ( on one needle ) in ribbing. Work these 16sts fro ½ inch. Bind off loosely. Work other 16 sts in same manner. Sew leg seams.
- K ( knit ) Inc ( increase )
- P ( purl ) desc ( decrease )
- O ( over ) psso ( pass slipped stitch over )
- Tog ( together ) sl ( slip )
- St ( stitch )
- sk ( skip )
- Ch ( chain ) sc ( single crochet )
Doll hat: With sock or fingering yarn and number 2 knitting needles, cast on 5 sts.
Row 1: K each st.
Row 2: P each st
Row 3: K1, ( k 1, p 1 ) in next
St, k 1, ( p1, k1 ) in next st, k 1.
Row 4: P each st
Row 5: K each set.
Row 6: P each st
Row 7: K 2, ( k 1, p 1 ) in next st, k 1, (p 1, k 1) in next st, k 2.
Continue to repeat rows 4 through 7 until there are 5 inc rows. The sts at beginning and end of each row inc 1 st on each inc row. After completing the 5th inc row work 7 rows in stockinette st (k 1 row, p 1 row).
Dec Row: K 5, sl 1, k 1, psso, k 1, k 2 tog, k 5.
Work 3 even stockinette rows. Repeat the dec row 4 times, each time there will be one less k st at the beginning and end of row. End with 2 stockinette rows. Bind off.
Using a number 5 steel crochet hook, join thread at one end of hat, ch 33 for tie, turn, sc in second ch st from hook, sc in each remaining ch st, sc in same end of hat, sc along one side of hat, sc in end of hat, ch 33, turn and complete as for first tie, sc at base of first tie, then fasten off.
Sweater: Using same yarn as for hat, cast on 50 sts. Work in ribbing of k 1, p 1 for 3/8- inch. Keeping 5 sts at beginning and end of row in ribbing, work body in stokinette st for 1 ¼ inches, ending with a p row.
Armholes: Continue working the ribbing at beginning and end of row, k 14, bind off 2 sts, k 18, bind off 2 sts, k 14.
Note: While making the right front be sure to make buttonholes at the following points: ¼ inch, 1 inch and ¾ inch after armhole is completed. Buttonholes are made in the following manner: With right side of work facing, k 1, p 1, O, k 2 tog, work in stockinette st across.
Right Front: Work 1 inch in ribbing and stokinette st on the last 14sts worked, end with a p row. Bind off 5 sts at front neck edge, k across.
Next Row: P 7, p 2 tog.
Next Row: K each st.
Next Row: Bind off 4 sts, p remainder of sts.
Left front: Work in same manner as for right front omitting button-holes and being sure to have the bound off sts at front.
Back: Work the center 18 sts in stockinette st for 1 inch. Bind off 4 sts at beginning of each of the next 2 rows. Bind off 3 sts at beginning if each of next 2 rows. Bind off remainder of sts/
Sleeves: Cast on 14sts. Work in ribbing of k 1, p 1 for ½ inch. Work 2 rows even in stockinette. Inc 1 st at beginning of each row 14 times ( an inc of 28 sts ). Bind off all sts. Sew sleeves in place, sew seams and then sew buttons in place.
Doll Coat: With knitting worsted and size 4 standard knitting needles, cast on 44 sts and work in moss st ( k 1, p 1 across one row, then p 1, k 1 across next row ) for ½ inch. Dec 1 st at beginning and end of next row.
Body of Coat – Row 1: K 9, k 2 tog, k 6, k 2 tog, k 6, sl 1, k 1, psso, k 5, sl 1, k 1, psso, k 8.
Row 2: P each st.
Row 3: K 8, k 2 tog, k 5, k 2 tog, k 5, sl 1, k 1, psso, k 8.
Row 4: P each st.
Row 5: K 7, k 2 tog, k 4, k2 tog, k4, sl 1, k 1, psso. K 3, sl 1. K 1, psso, k 8.
Row 6: P each st.
Row 7: K 6, k 2 tog, k 3, k 2 tog, k 3, sl 1, k 1, psso, k 2, sl 1, k 1, psso, k 8. ( 26sts ).
Work in stockinette st on these sts until piece measures 2 ¼ inches from cast on sts and place these sts on st holder. Cast on 7 sts for sleeve, now k the 7 sts for sleeve, now k the 7 sts, k 12 sts for back, place 7 sts remaining on left needle on st holder, now cast on 7sts for other sleeve. Work across these 26 sts in stockinette st for 7 rows.
Neck: K 8, bind off 8 sts, k 8, place these 16 sts on st holder. Cut yarn.
Right Front: Pick up 7 sts fro right front, cast on 7 sts at armhole edge. Work 7 rows in stockinette st, end at front edge. Bind off 6 sts, k each remaining st across.
Next Row: P 6, p 2 tog.
K next row: Using tapestry needle threaded with about 12-inch length of yarn left after last st, weave these remaining sts with corresponding sts from right back sleeve. Weave in stockinette st as shown in ketch for a smooth joining.
Work left front and sleeve in same manner.
Edge: Beginning at left front edge, use number 1 steel crochet hook, work a row of s up front and around neck and down right front.
Ch 1, turn, sc up right front, be sure to ch 2, sk 2 sc, sc in next sc for a buttonhole at 3 evenly spaced intervals on right front. Work around and down left front with a sc in each sc. Fasten off. Sew buttons in place on left front.
To complete the sleeves, fold back one row of sts on each side underarm edges and sew.
Panties: With fingering or sock yarn and number 2 double pointed knitting needles, cast on loosely 32 sts. Divide sts on three needles: 12, 10, 10. K one row. Work in ribbing of k 1, p 1 for 1 ¼ inches. Now k 16 sts ( on one needle ) in ribbing. Work these 16sts fro ½ inch. Bind off loosely. Work other 16 sts in same manner. Sew leg seams.

Felt Skirt: Cut 2 pieces for skirt, using pattern given in chart ( each square equals 1 inch ). Cut 1 waist band 3/8- inch x 3 ¾ inches long.
Whip stitch one side of seam of skirt, whip stitch other side leaving ¾ inch free at top for placket. Whip stitch waistband in place allowing one end to extend beyond placket for buttoning skirt. Cut a small slit in extended end of waistband for buttonhole and sew button in place on opposite end of waistband.
For more patterns visit - Vintage Crochet Patterns and Vintage Knitting Patterns
Vintage Crochet Pattern Blog - Long Lost Patterns Help You Bring The Past Alive
